Going Live
Connect to TikTok Live Studio
Put your Livecade overlay on screen in TikTok Live Studio. Use OBS and its Virtual Camera for smooth playback, with a quick Link source for testing and clean game audio via VB-Cable.
Updated
You have your overlay URL from the dashboard. The next step is putting it on screen inside TikTok Live Studio. The recommended way is through OBS and its Virtual Camera, which gives you smooth, reliable playback. TikTok Live Studio's built-in Link source works too, but it tends to lag, so use it only for a quick test.
This guide also covers routing the game's audio cleanly with VB-Cable, so the sound your viewers hear is the game itself and not whatever else is playing through OBS.
Before you start
- Your overlay URL copied from the dashboard. See Getting Started if you have not set this up yet.
- OBS Studio installed (for the recommended method).
- TikTok Live Studio installed.
- VB-Cable installed if you want clean game audio (covered below).
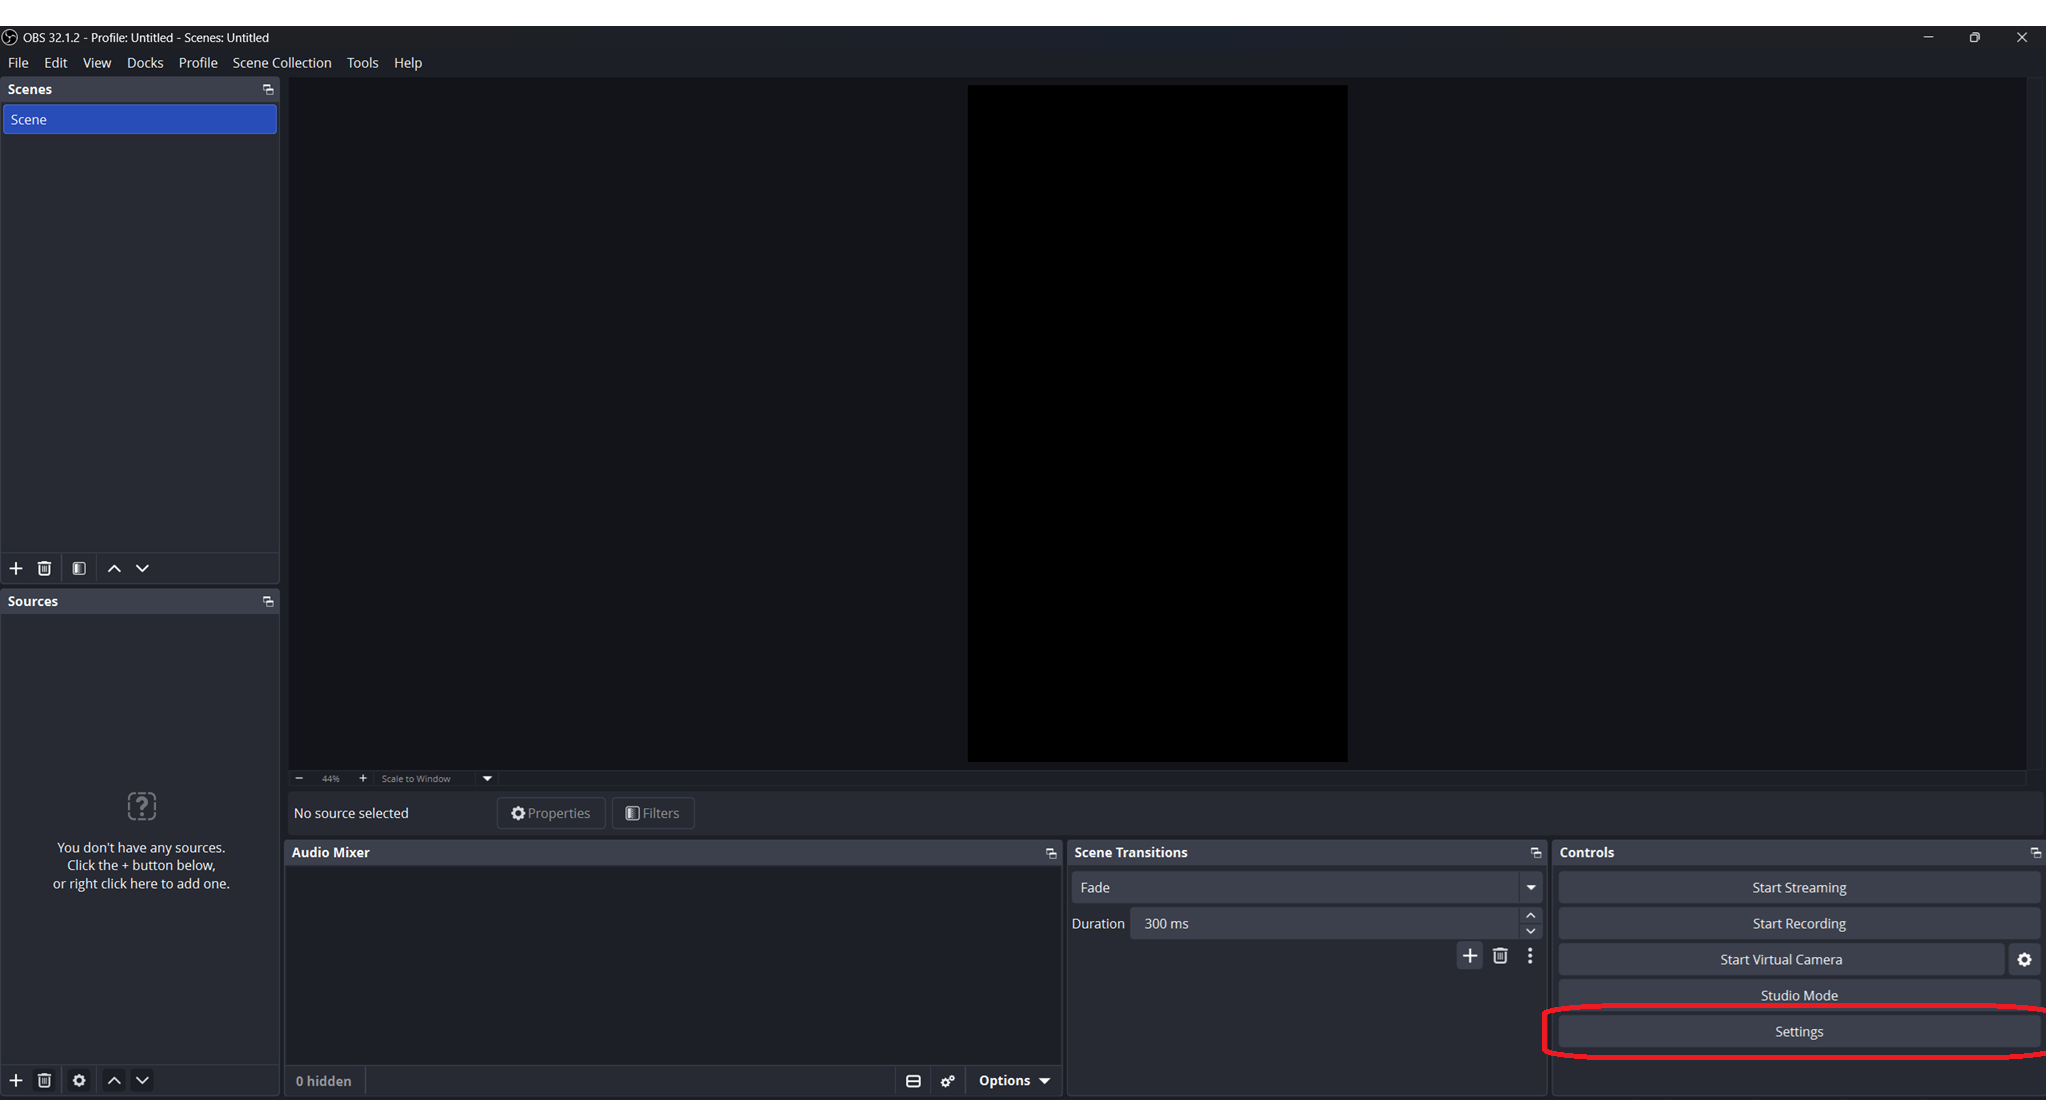
Find your way around OBS
Before the steps, here is where things live in OBS. You will use three areas:
- Sources (bottom left): the list of things on your screen. You add the overlay here.
- Controls (bottom right): buttons like Start Streaming and Start Virtual Camera.
- Settings (in Controls, or File -> Settings): where the canvas size and audio options live.
Recommended: OBS Virtual Camera
You load the overlay in OBS, start the Virtual Camera, then add that virtual camera to TikTok Live Studio as a normal Camera source. OBS captures the overlay cleanly and hands TikTok a smooth feed.
Set the OBS canvas to vertical
TikTok is a vertical 9:16 screen. Match it in OBS first, or the overlay will be cropped or letterboxed.
-
In OBS, open Settings (bottom right, in the Controls panel).
Open Settings from the Controls panel. -
Click the Video tab on the left.
-
Set Base (Canvas) Resolution to 1080x1920.
-
Set Output (Scaled) Resolution to 1080x1920 as well.
-
Set Common FPS Values to 30 or 60 (your choice), then click OK.
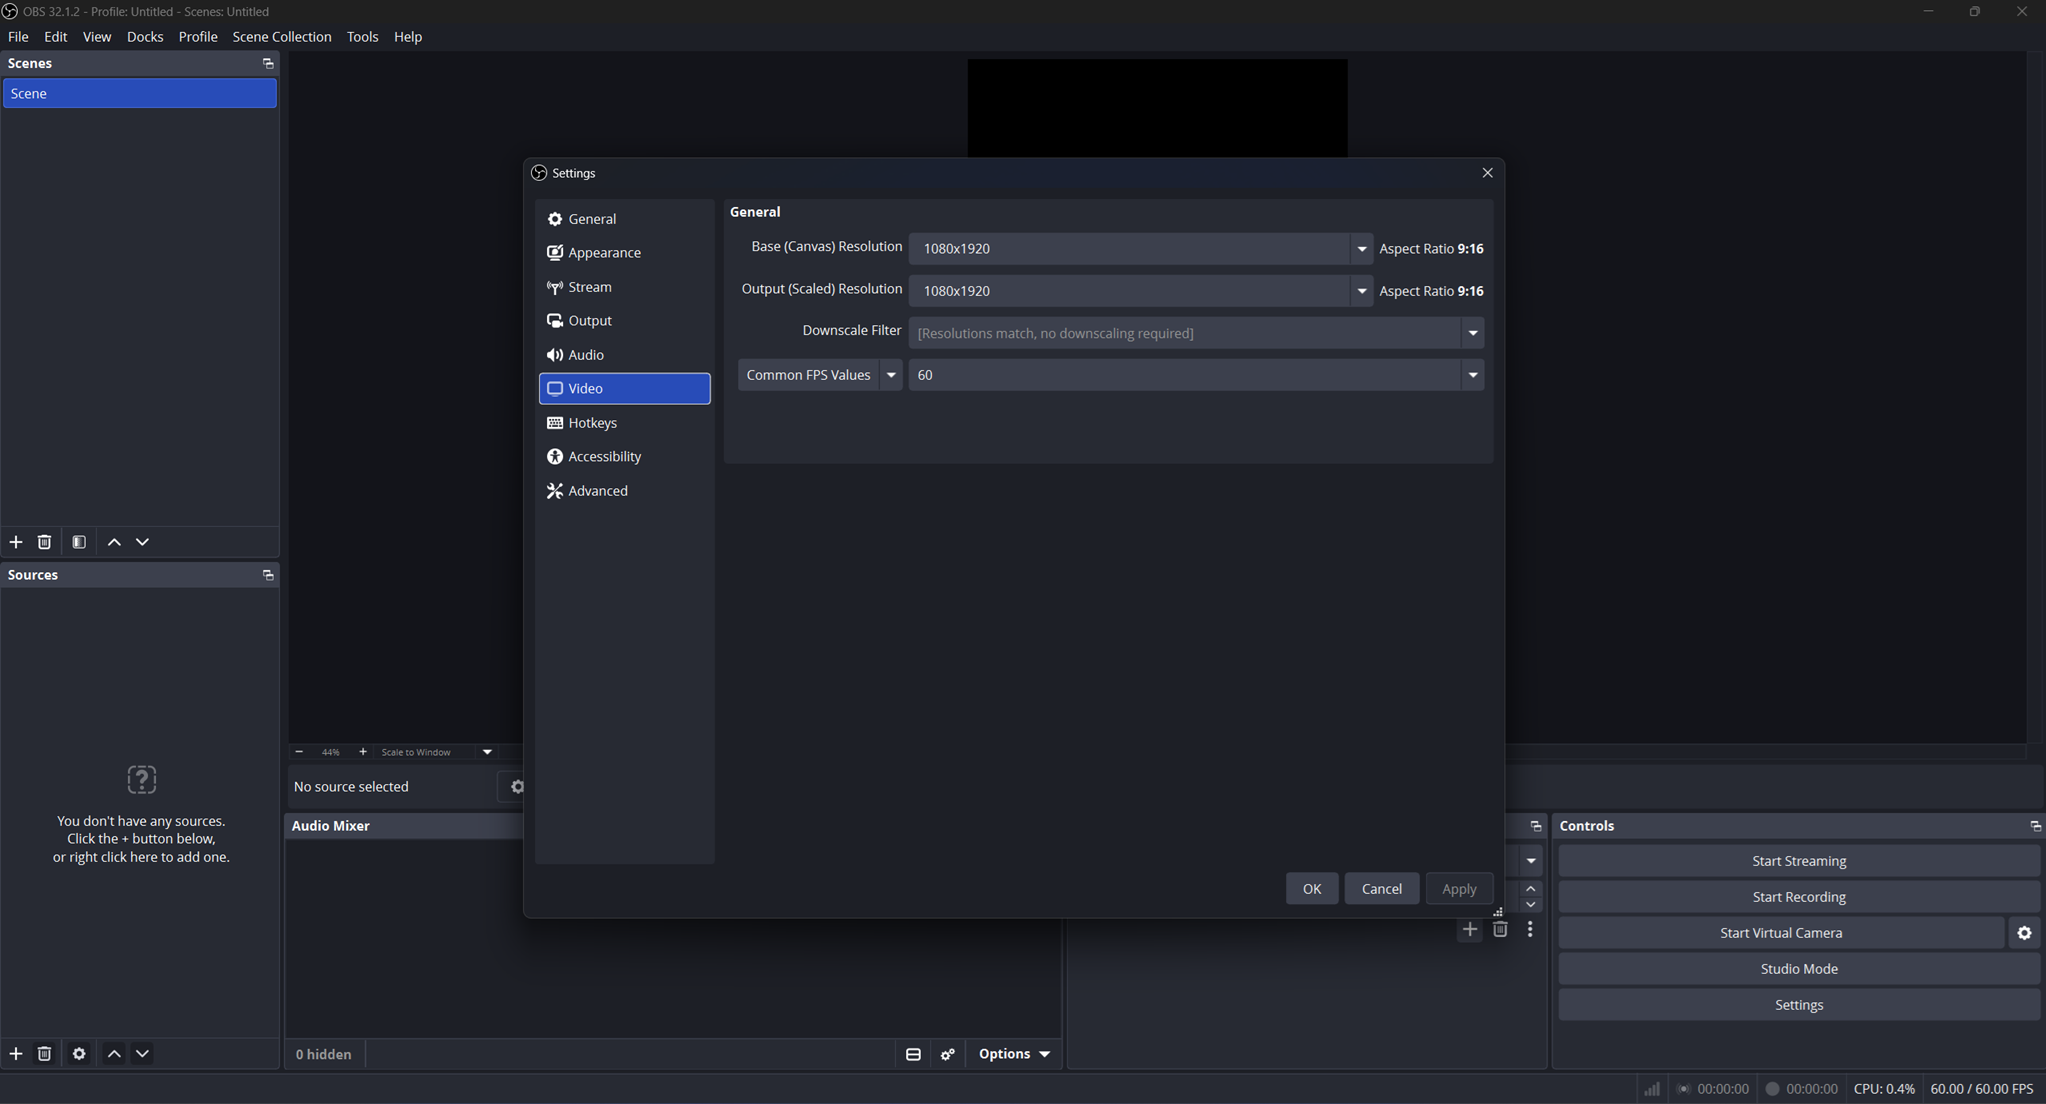
Both resolutions set to 1080x1920, aspect ratio 9:16.
Add the overlay to OBS
-
In the Sources panel (bottom left), click the + button.
-
Choose Browser from the list, give it a name, and click OK.
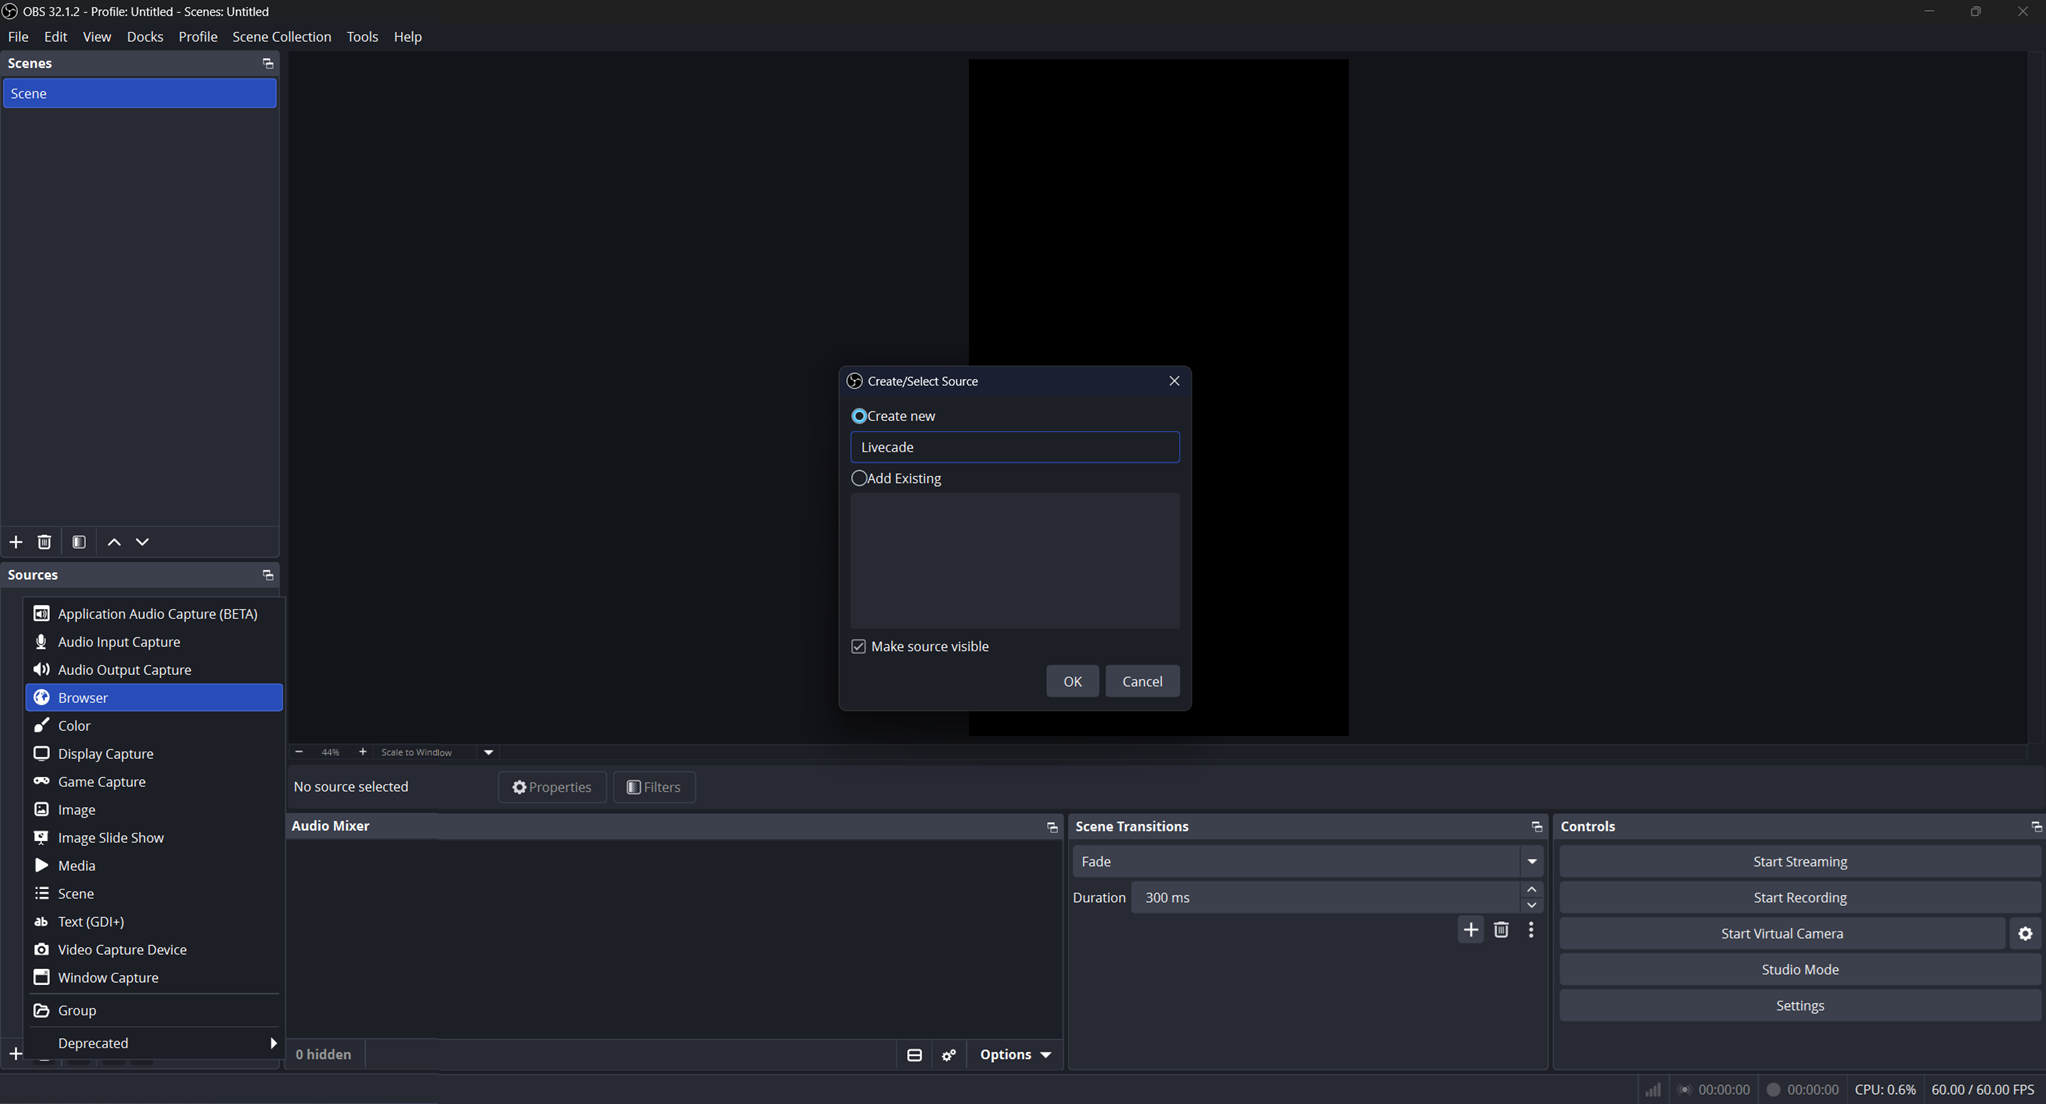
Add a new Browser source from the Sources panel. -
Paste your overlay URL into the URL field. It looks like
https://overlay.livecade.io/.... -
Set Width to 1080 and Height to 1920.
-
Check Control audio via OBS. This is required for the VB-Cable audio routing below to work.
-
In Custom CSS, make sure this line is present so the overlay background is transparent:
body { background-color: rgba(0, 0, 0, 0); margin: 0px auto; overflow: hidden; } -
Leave Use custom frame rate unchecked. The overlay follows your canvas FPS. Click OK.
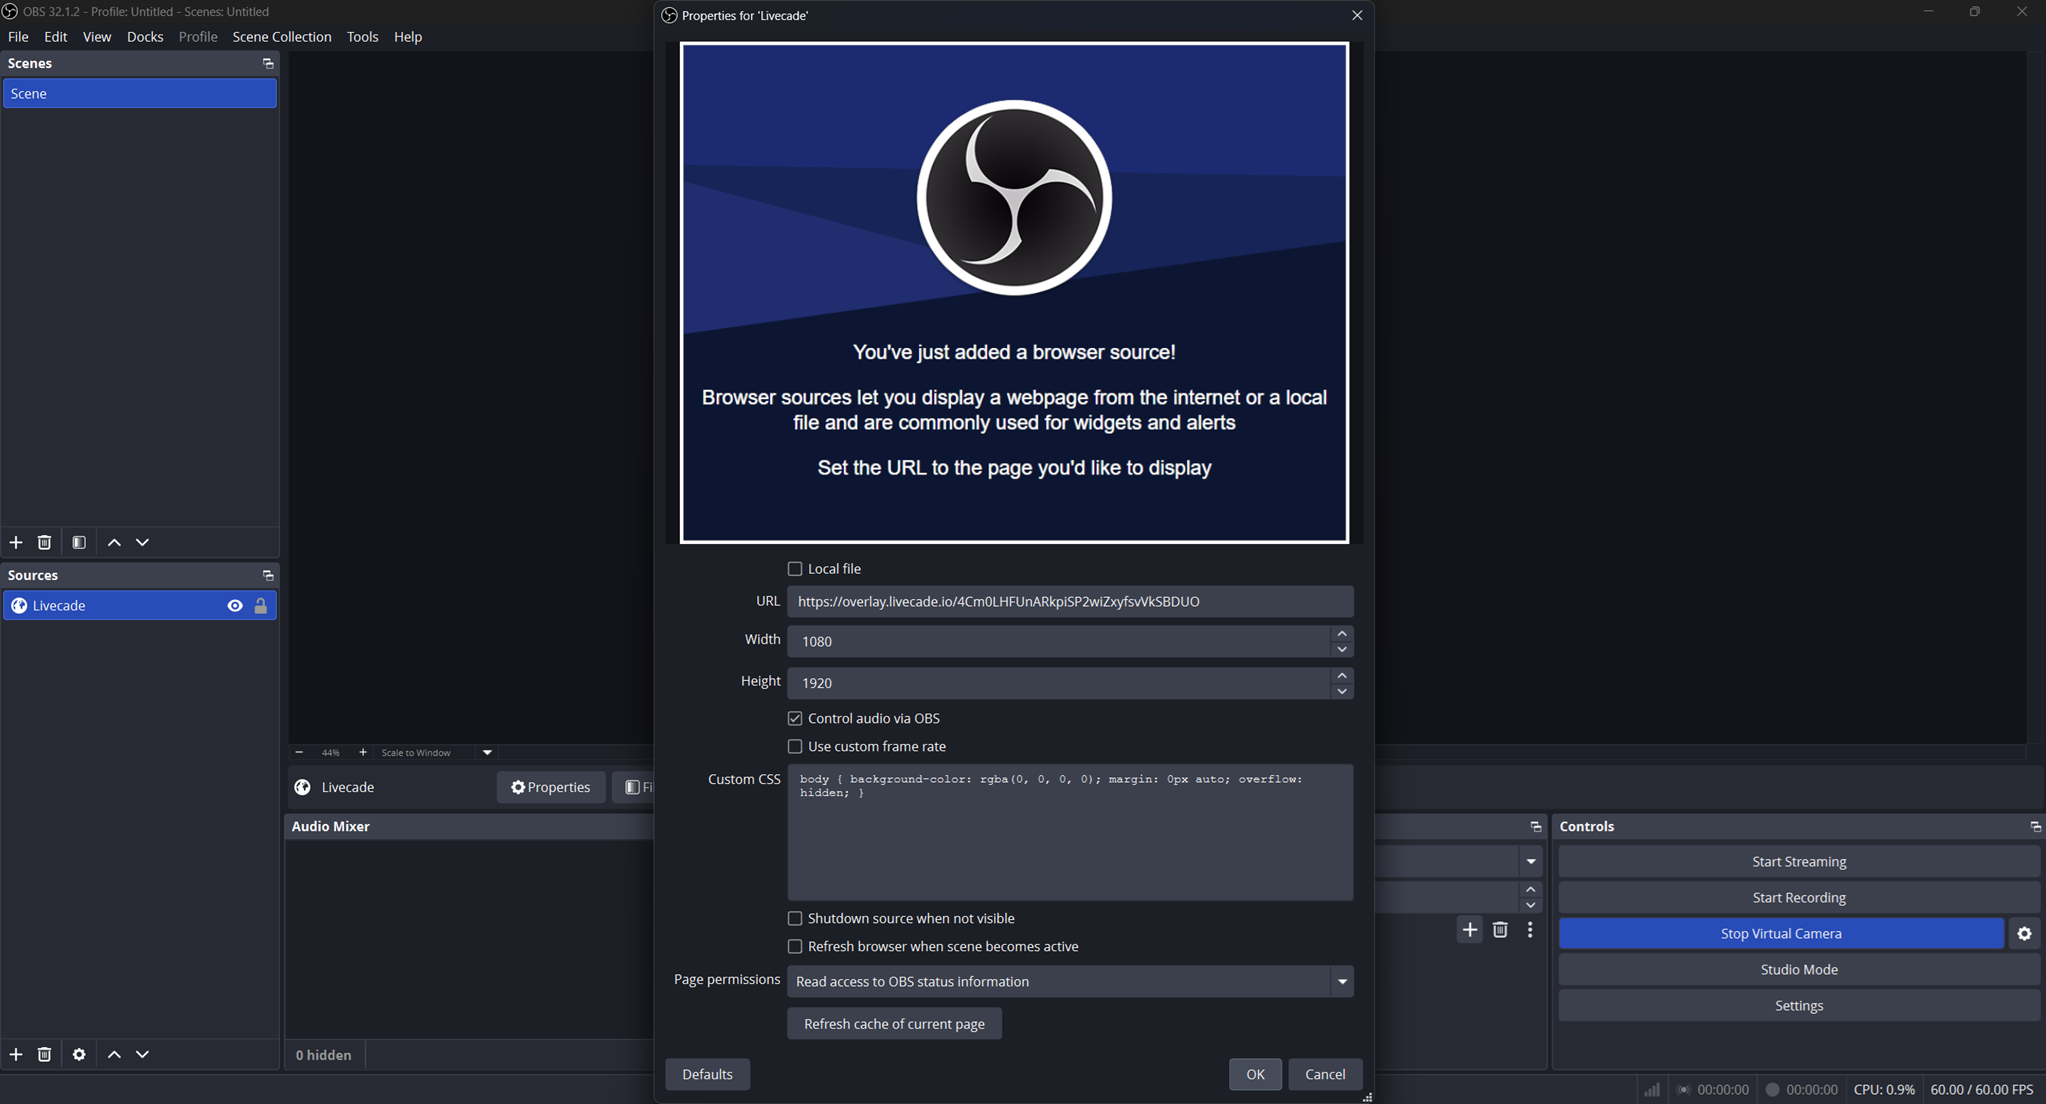
URL and size set, Control audio via OBS checked, transparent background CSS in place.
Start the Virtual Camera
-
In the Controls panel (bottom right), click Start Virtual Camera. Leave it running for the whole stream.
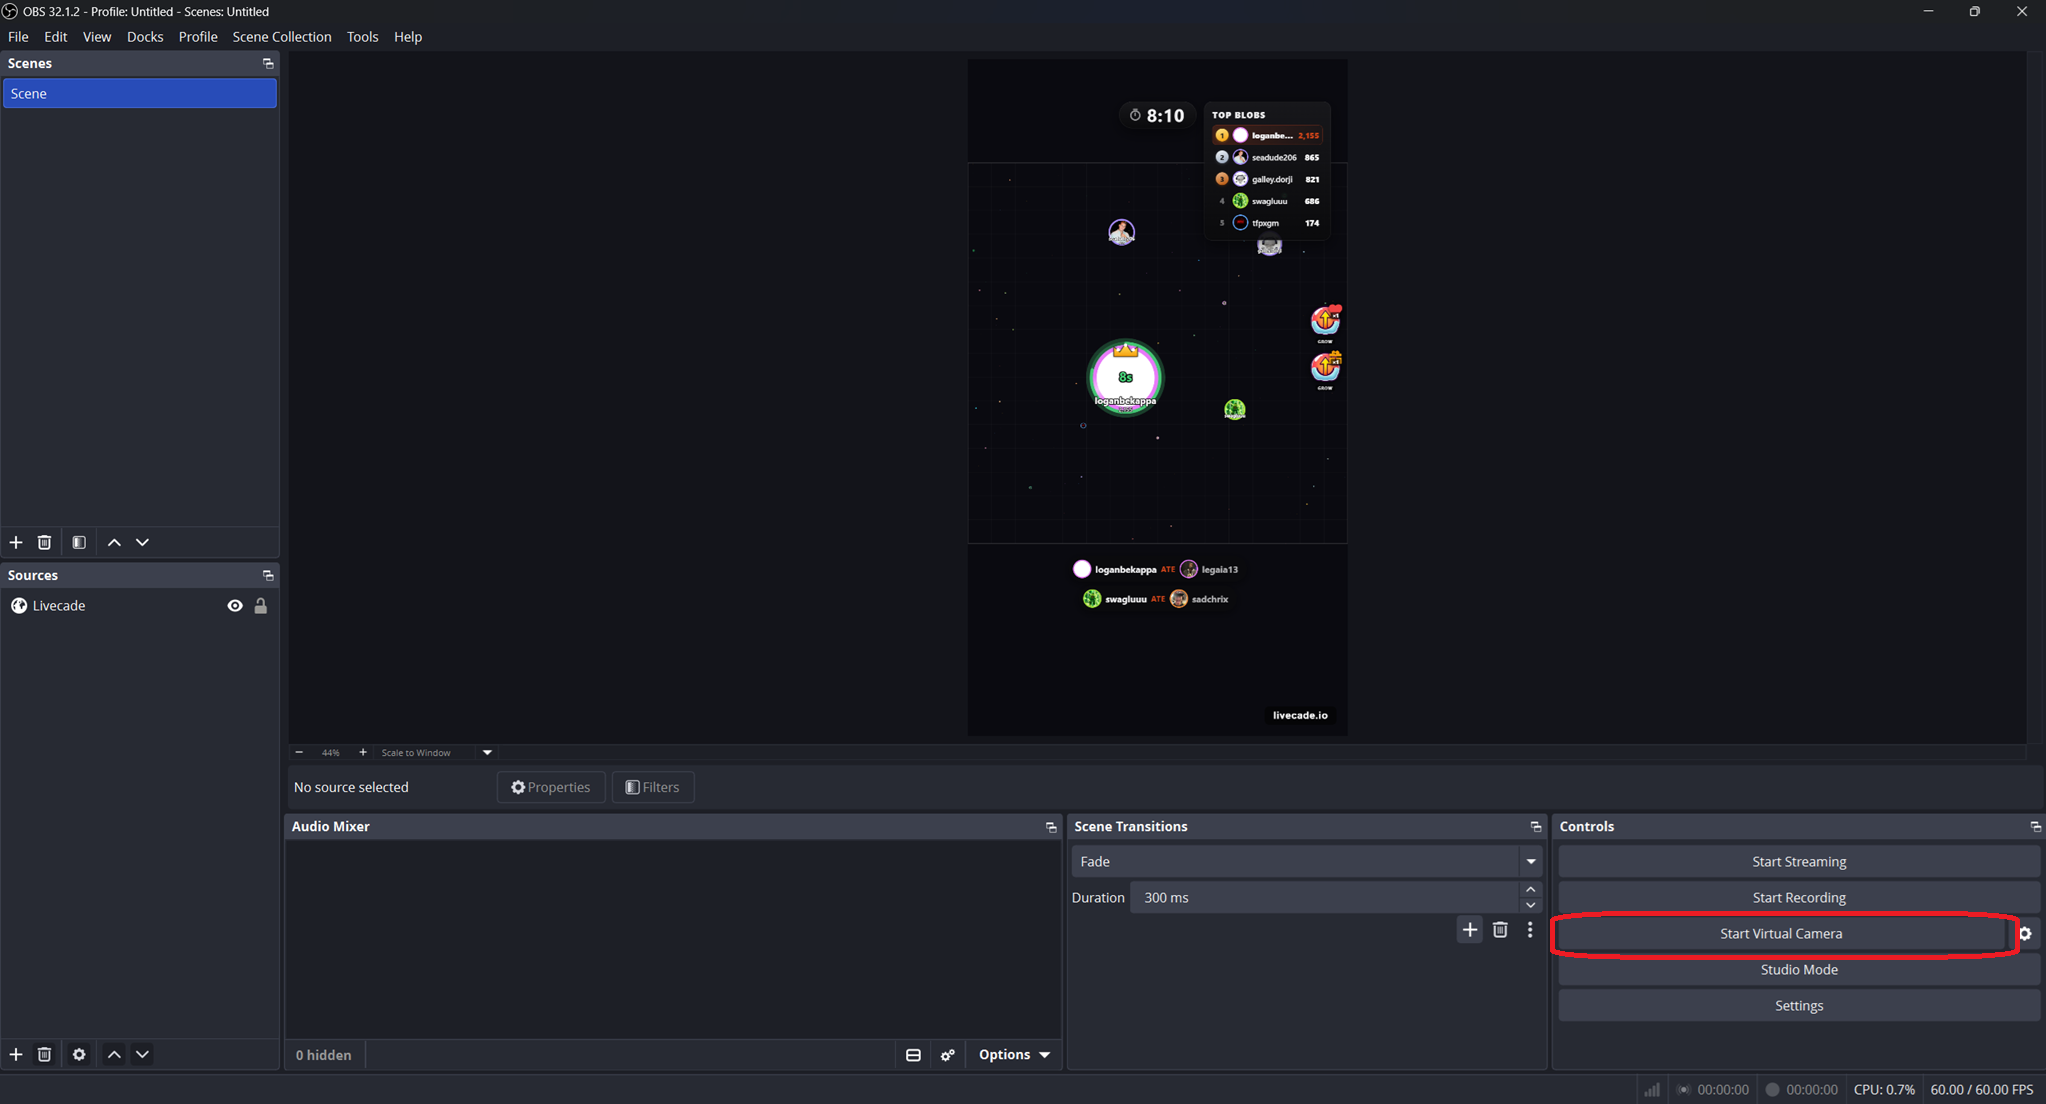
Start the Virtual Camera. Keep OBS open while you are live.
Add the Virtual Camera in TikTok Live Studio
-
In TikTok Live Studio, click Add source and choose Camera.
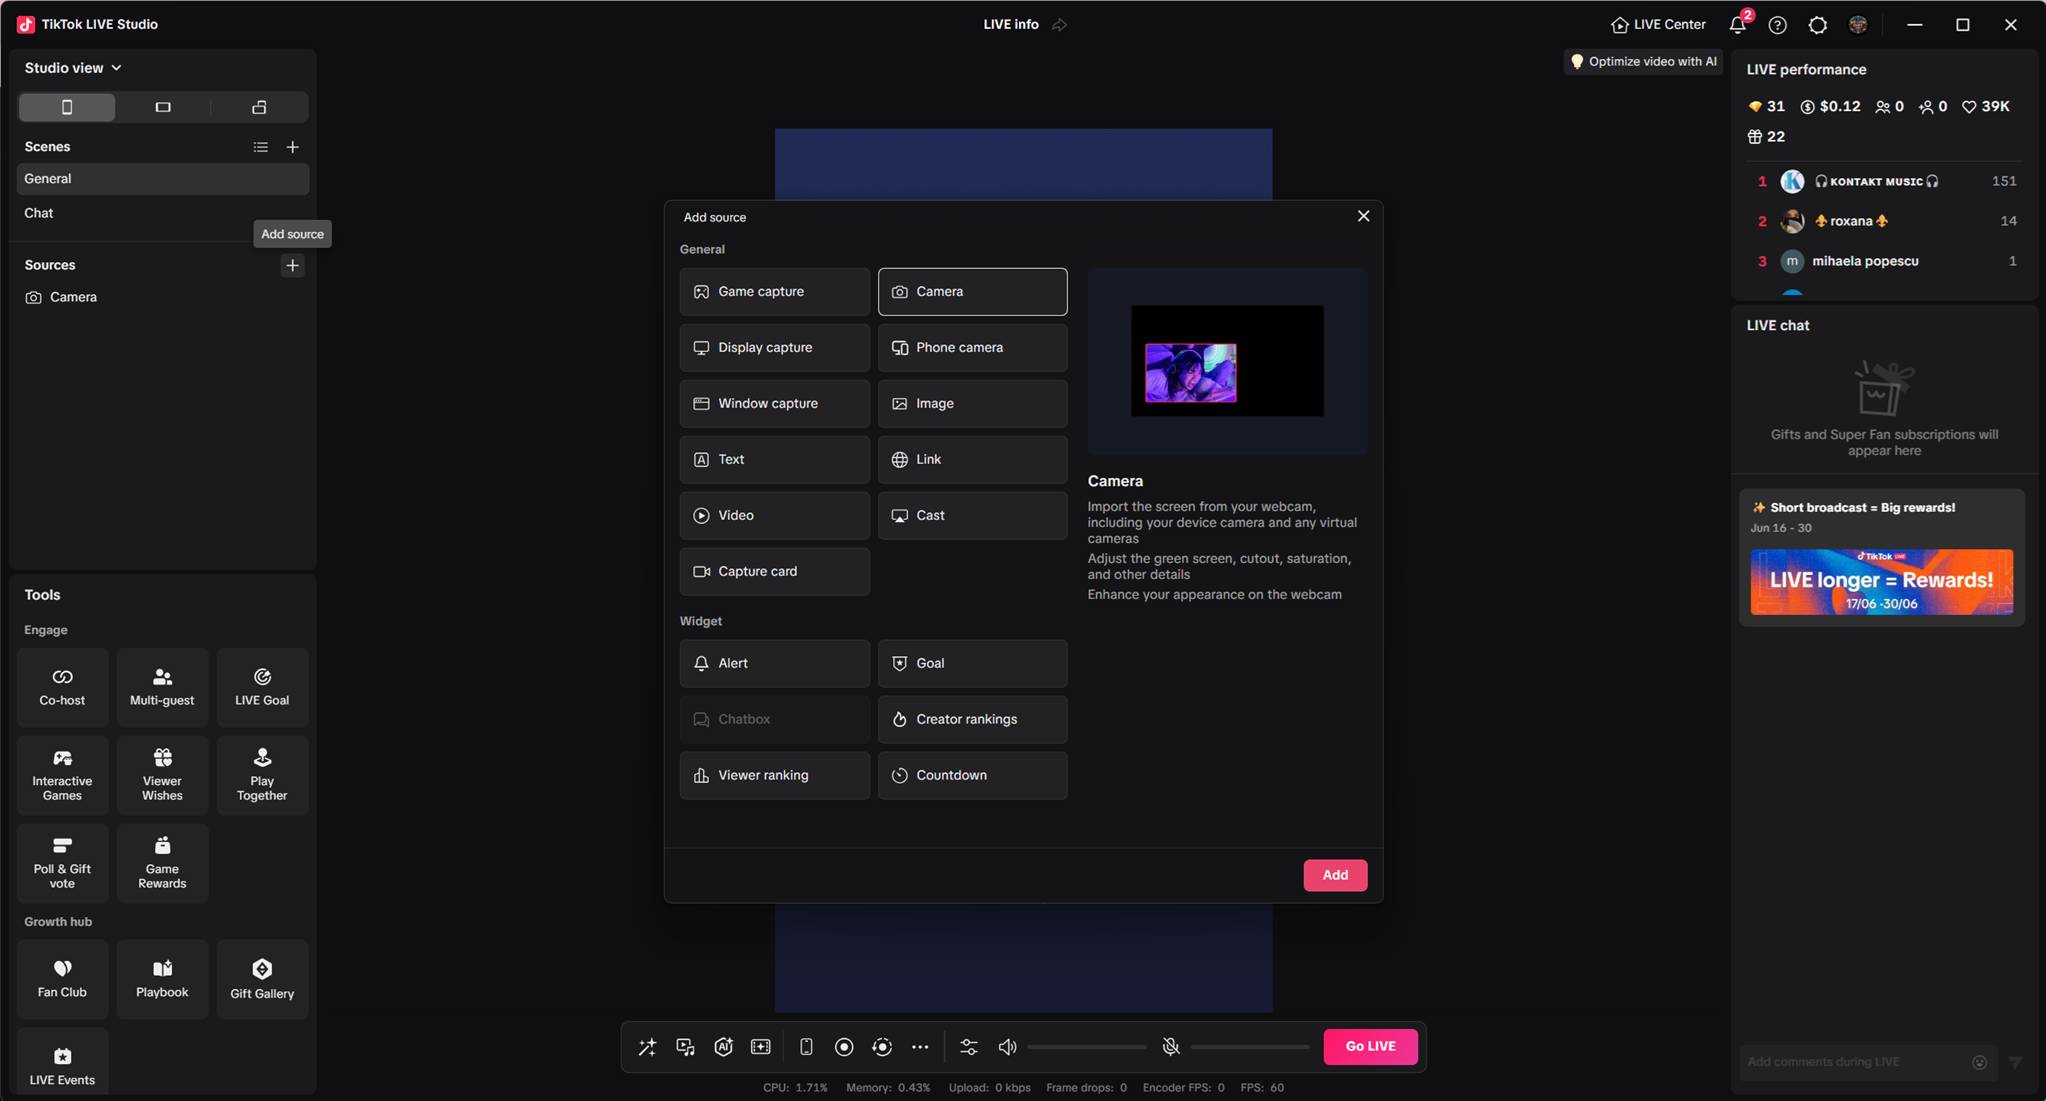
Add a Camera source in TikTok Live Studio. -
Set the Camera to OBS Virtual Camera and the Resolution to 1080x1920.
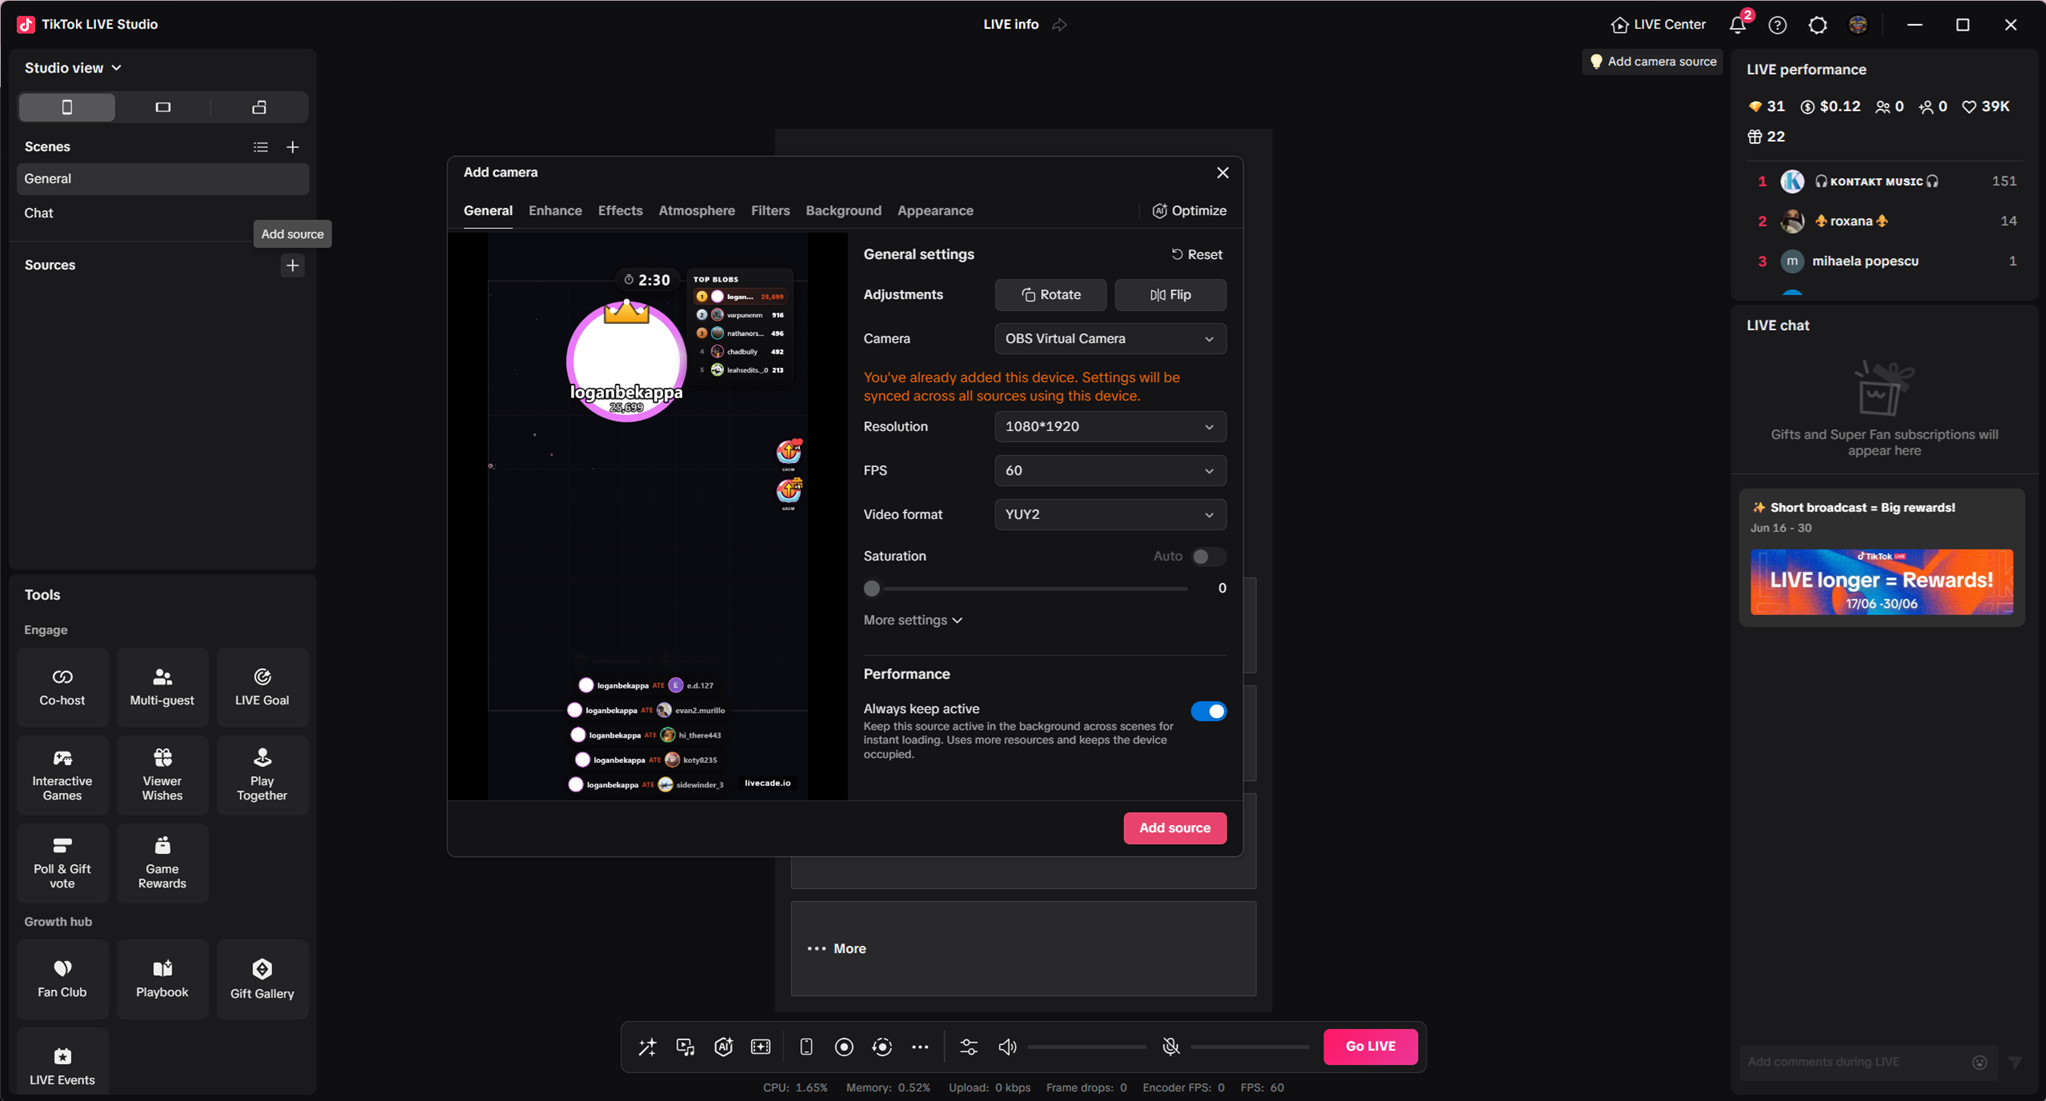
Select OBS Virtual Camera at 1080 x 1920. -
If the overlay looks mirrored, click Flip under Adjustments so text and the layout read the right way around. Then add the source.
-
Drag the corners to fill the canvas, then go live.
Audio: route game sound cleanly with VB-Cable
This applies to the OBS Virtual Camera method. By default, TikTok can pick up everything playing through OBS, including background music. VB-Cable is a free virtual audio cable that sends only the game's sound to TikTok. It also lets you hear the game's own audio cleanly in the dashboard, without OBS music bleeding in.
The flow is: OBS game audio -> CABLE Input -> TikTok Live Studio audio source (CABLE Output).
-
Install VB-Cable and reboot if prompted.
-
In OBS, open the Audio Mixer, click the gear on your overlay source, and choose Advanced Audio Properties.
-
Set the source's Audio Monitoring to Monitor and Output.
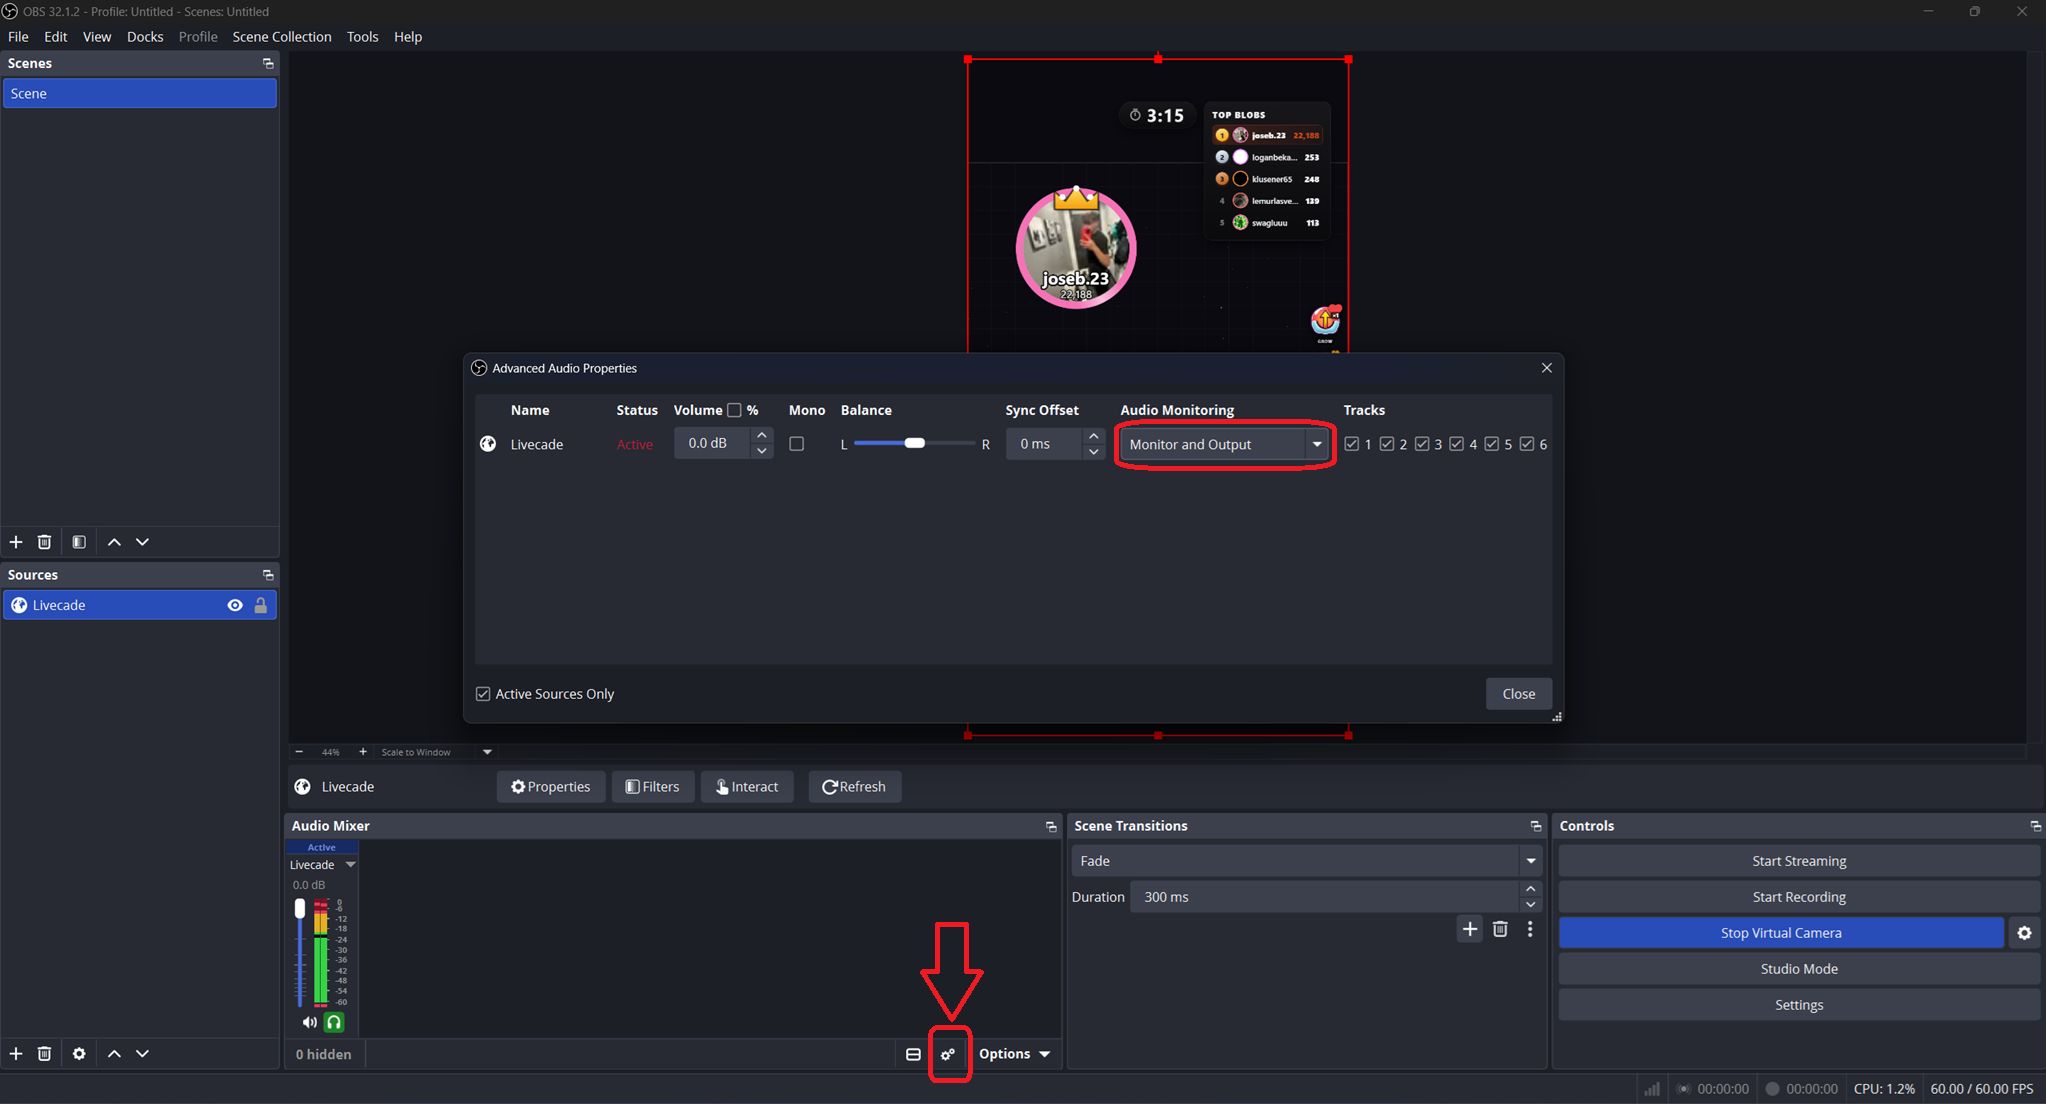
Set the overlay source to Monitor and Output. -
Open Settings -> Audio, scroll to Advanced, and set Monitoring Device to CABLE Input (VB-Audio Virtual Cable). Click OK.
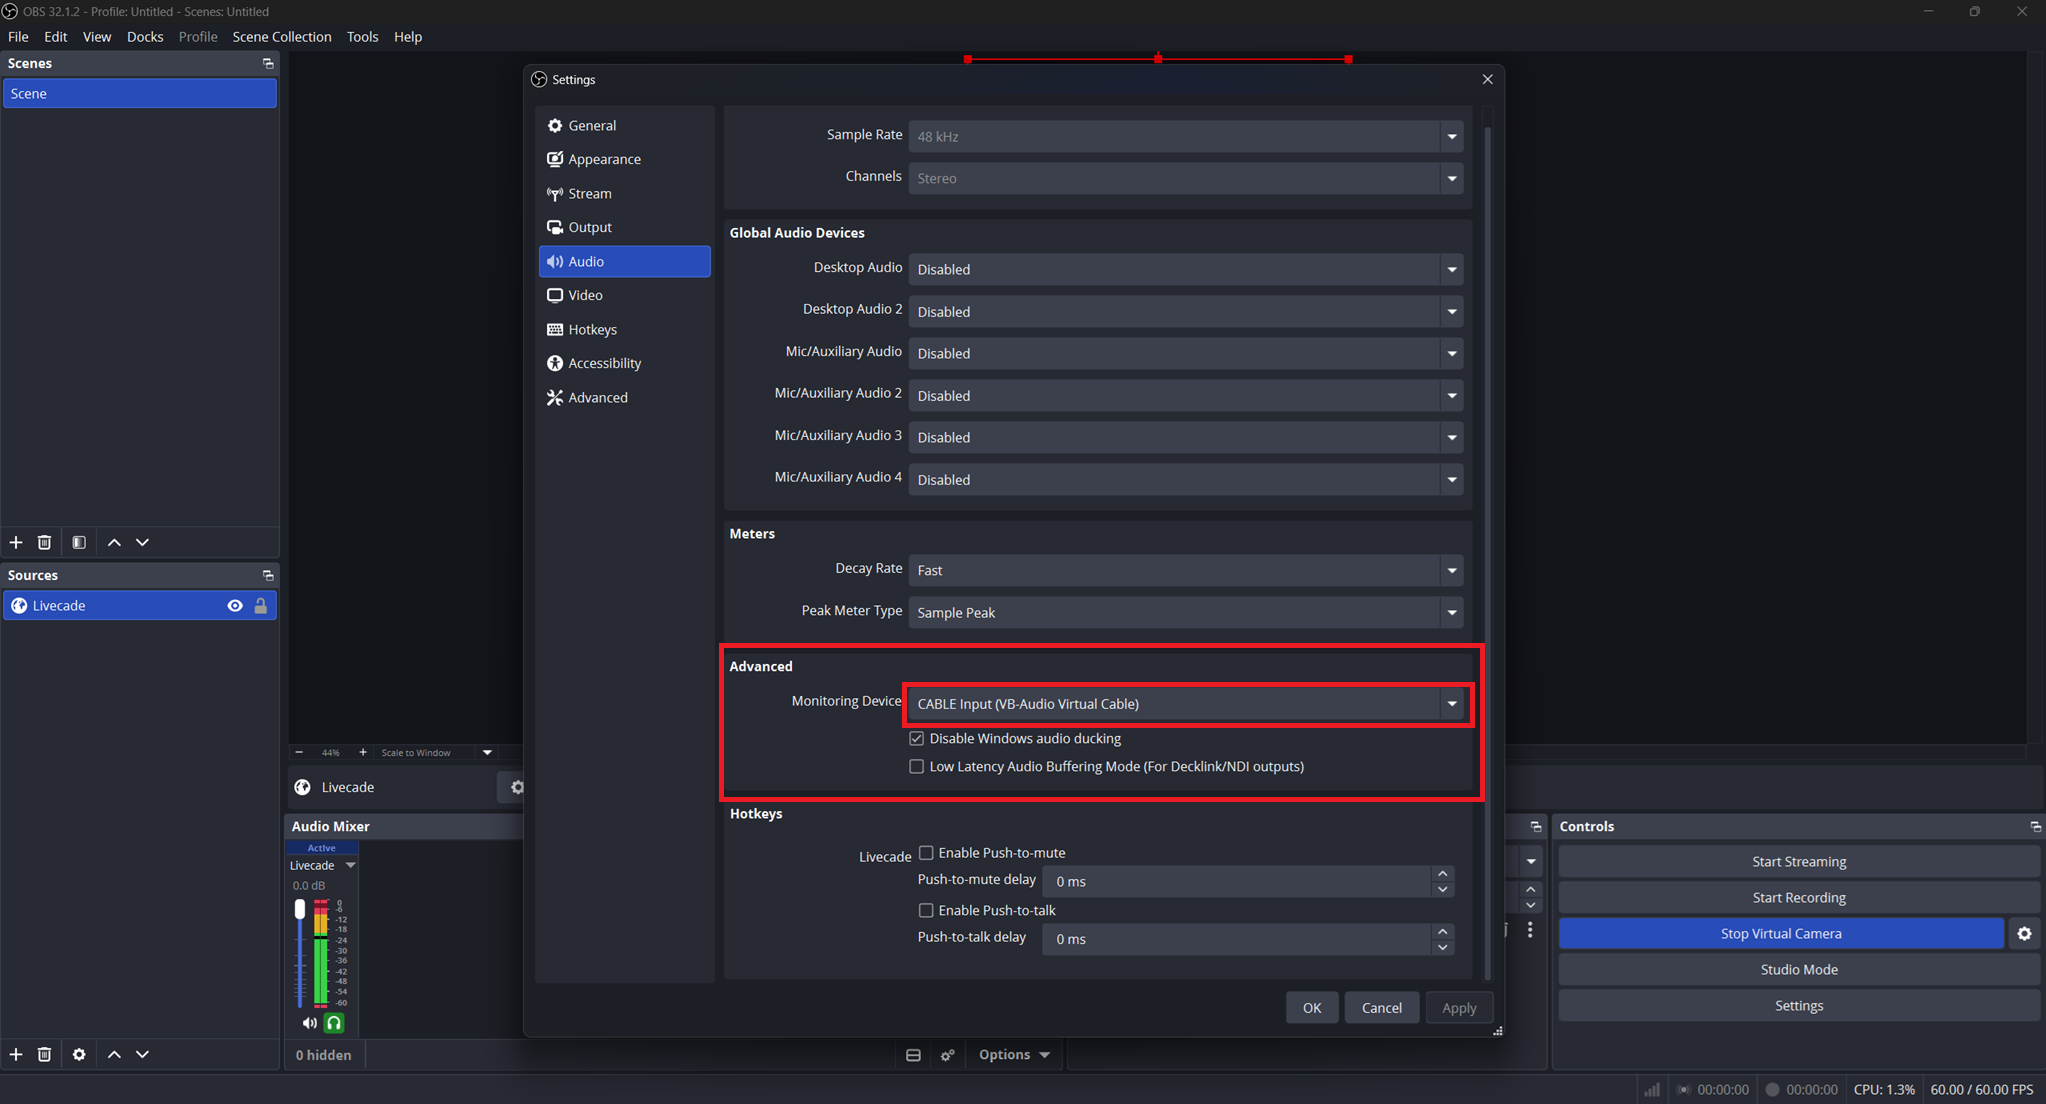
Point the OBS Monitoring Device at CABLE Input. -
In TikTok Live Studio, open the Audio mixer and set the Audio (speaker) source to CABLE Output (VB-Audio Virtual Cable).
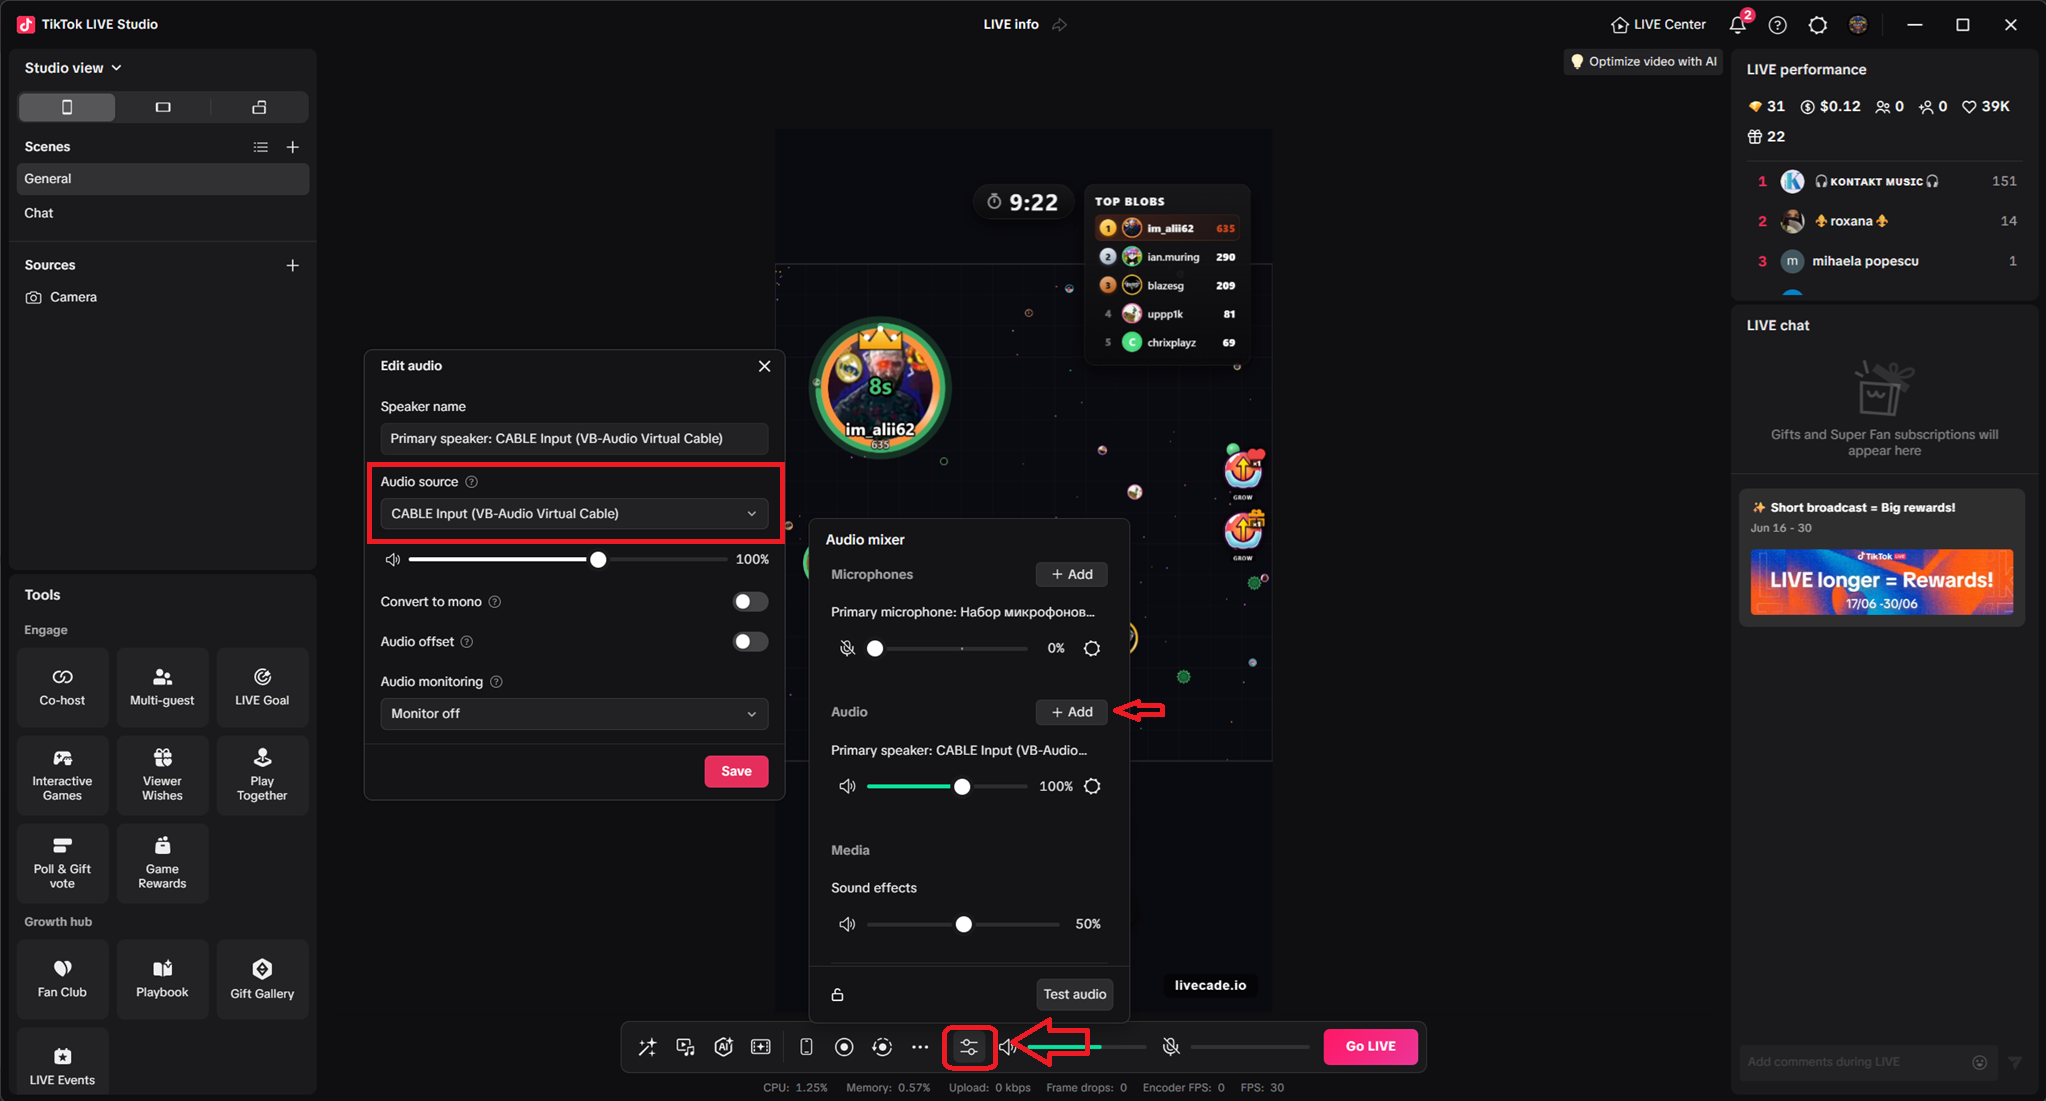
TikTok Live Studio capturing game audio from the VB-Cable device.
Now only the game's audio reaches your viewers, and you can hear the same clean feed in the dashboard preview. Other system sounds and OBS background music stay out of the broadcast.
Quick test: Link source
If you just want to check that the overlay loads, you can add it directly in TikTok Live Studio.
-
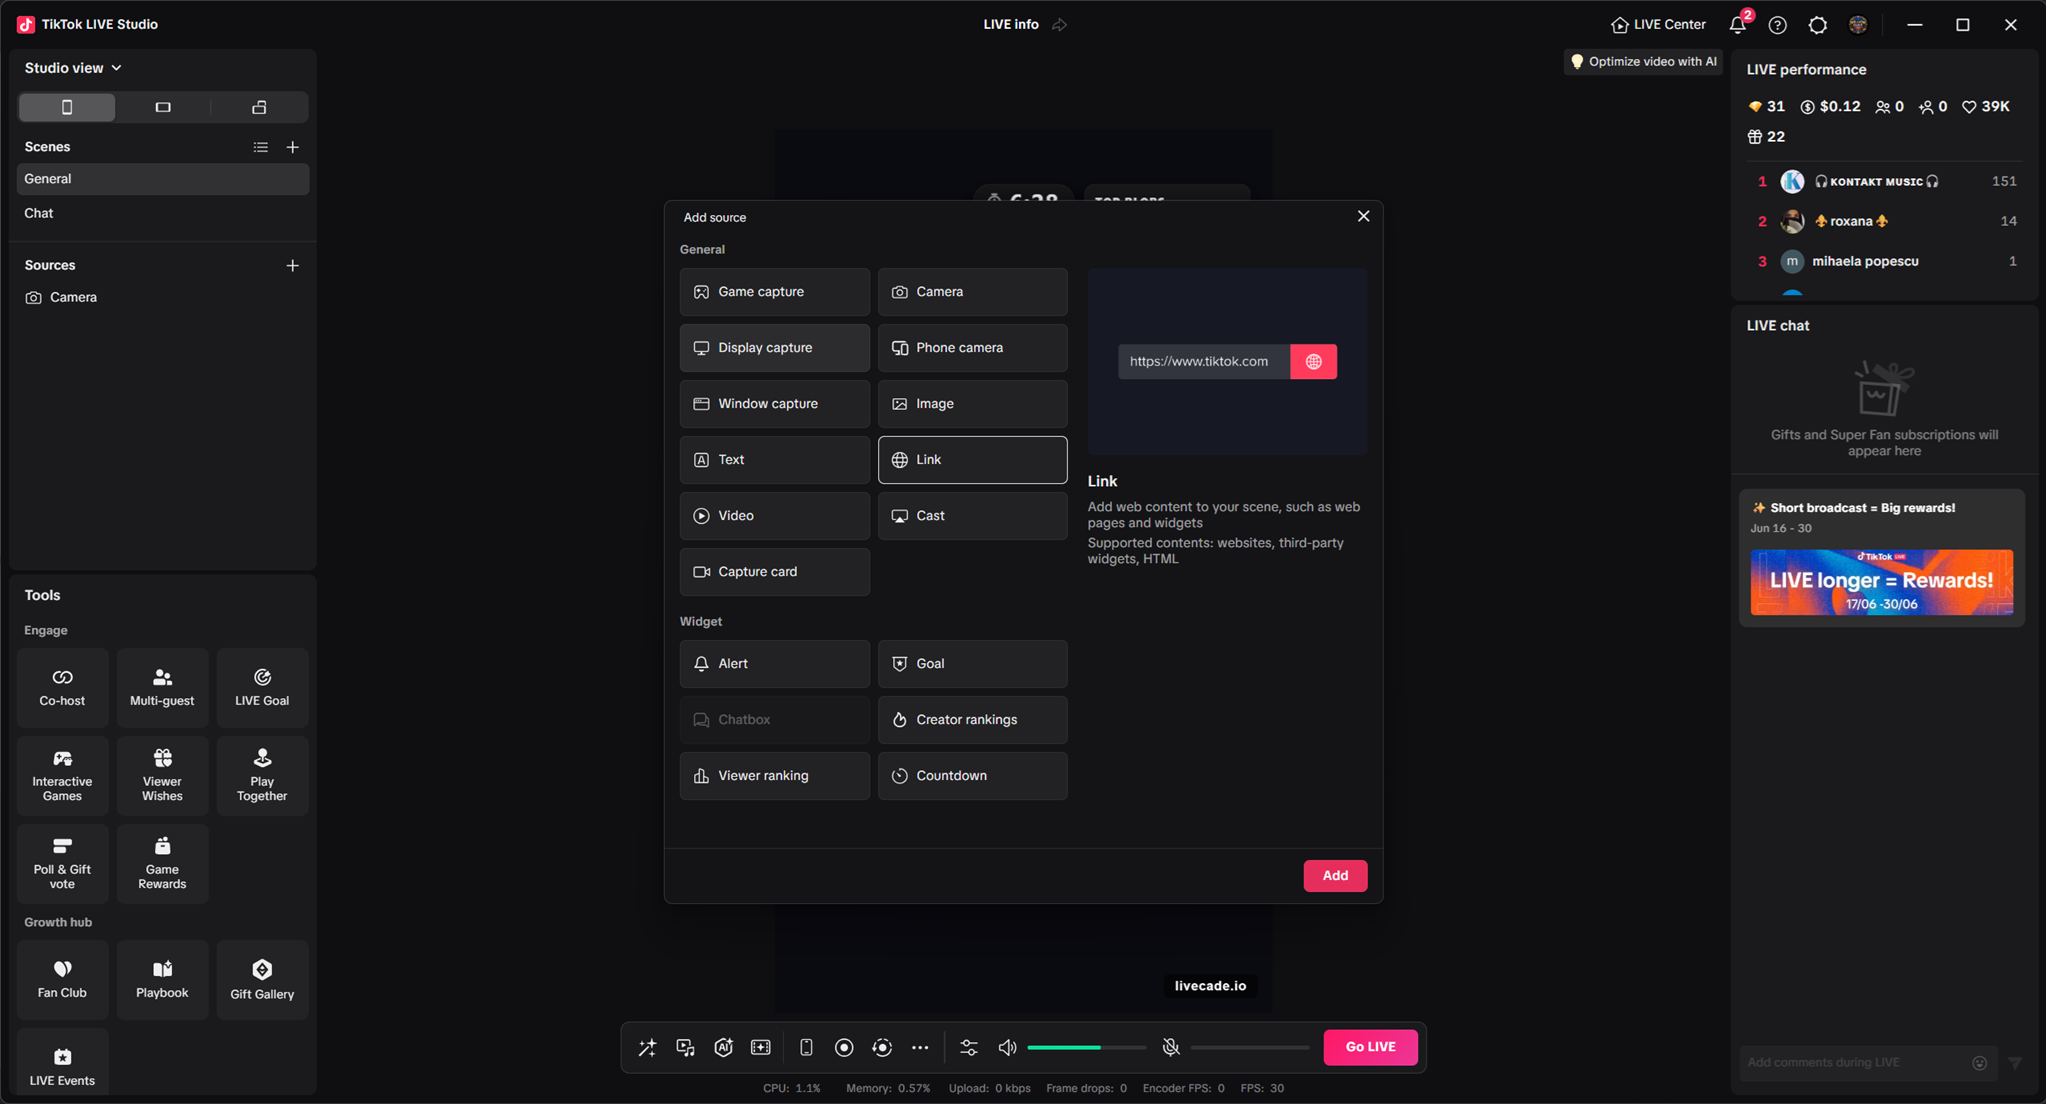
Click Add source and choose Link.
-
Paste your overlay URL and add it.
The Link source is fine for a quick look, but it tends to lag. Use the OBS Virtual Camera method above for actual streaming.
Next step
With the overlay on screen, start your dashboard session so chat and gifts flow into the game. See Start a Live Session to start a session.
System requirements
OBS and TikTok Live Studio run at the same time, so give the machine enough headroom for both. A dedicated GPU lets OBS encode the virtual camera in hardware instead of loading the CPU, which keeps the overlay smooth.
| Component | Minimum | Recommended |
|---|---|---|
| CPU | 4-core (Intel i3-10100, Ryzen 3 3100) | 6-core (Intel i5-10400, Ryzen 5 3600) or newer |
| RAM | 8 GB | 16 GB |
| GPU | Integrated | Dedicated GPU |